Perhaps the most important component of any guitar is the neck, it’s the interface of the guitar, so it pays to ensure the neck is in good shape. In the following article, I’m going to show you how to inspect, and adjust the neck of your acoustic guitar via the truss rod, to ensure your guitar plays and sounds great. But, if you are in a hurry I’ve summarised the steps below:
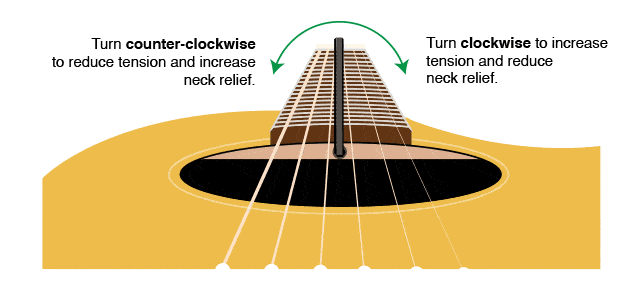
To adjust the neck of your acoustic guitar first ensure the guitar is tuned to concert pitch. Next, identify the problem e.g. insufficient neck relief can cause fret buzz and/or dead notes. Too much relief can affect intonation and string action. Next, access the truss rod (located inside the soundhole on acoustic guitars) and, using a nut driver or hex key, turn counter-clockwise to increase neck relief or clockwise to reduce neck relief. Always work in small increments e.g. a quarter turn at a time.
For a more detailed explanation of truss rod adjustment continue reading below, and if you are interested in learning more about acoustic guitar maintenance click the link to check out some of our other articles.
What is a Truss Rod?

Your guitar’s neck is made from wood. Wood, being an organic material, is subject to change.
This could be due to changes in temperature and/or relative humidity or simply be the result of prolonged tension from the strings gradually forcing structural changes over time.
This is pretty important for steel-string acoustic guitars as they are typically fitted with heavier gauge strings than electric guitars.
To combat these changes on steel string guitars (and some, but not all classical guitars) an adjustable steel rod, known as a truss rod is inserted into a channel, lengthwise, in the guitar’s neck, just beneath the fretboard.
Just as trusses used in construction are designed to manage tension and evenly distribute forces, truss rods are used to counter the tension placed on the neck from the strings, essentially preventing your guitar’s neck from becoming bowed.
Types of Truss Rods
Single-action Truss Rods
There are two specific types of truss rods, single-action, and dual-action. Single-action truss rods, as pictured in the diagram above, are threaded on one end to accommodate a washer and nut. They sit within a curved channel inside the neck and when tightened flatten out, reducing neck relief.
They can only be adjusted one way. However, when tension is reduced e.g. the truss rod is loosened, and neck relief increases.
Dual-Action Truss Rods
Dual-action truss rods feature a second rod (hence the name dual-action). There are different types of dual-action truss rods available, but the main advantage of them is that the truss rod can be adjusted both ways.
In the example below, we can see the top bar is fixed to washers on each end of the lower bar. Adjusting the position of the washers forces the top bar to arc outward if the washers are closer together or inward if the washers are further apart.

While a dual-action truss rod might sound like an upgrade, many guitarists still prefer single-action truss rods as they contribute less weight to the neck and require less wood to be removed as the channel is shallower.
Ok, now that we know what a truss rod is, the different types, and how they work we can move on to assessing the neck of the guitar and identifying potential issues we can attempt to fix with the truss rod.
What to look for when assessing your neck
There are three main areas of concern when inspecting a guitar’s neck that your truss rod can help with. And, while truss rod adjustment isn’t the sole answer for all, it can be part of the solution. These include:
Fret Buzz or High String Action
String action refers to the distance between the underside of the strings and the fretboard. If the action is too high, the guitar becomes more difficult to play, requiring more force to push down the strings.
If too low, the strings might ‘buzz’ against the fret wires resulting in ‘fret buzz’ and dead notes. String action is mostly controlled by the height of the two points of contact for the strings e.g. saddle and nut but adjusting the amount of relief on the neck also has a big impact on your action.
What are Dead Notes?
Dead notes are notes muted by the preceding fret due to being lower, which effectively dampens the note being played. You can read more about dead notes and how to fix them here.
Twists in the neck
If the neck has a twist, the alignment of the bridge saddle, frets and nut are affected. This is a serious issue and can result in the guitar becoming unplayable. In some cases adjusting the truss rod can help, but in the majority of cases, will require the skills of an experienced luthier.
Intonation
Intonation refers to the accuracy of pitch. In simple terms, this means how ‘in tune, the guitar is with itself.
To adjust intonation we’ll need to either reduce or lengthen the scale length of individual strings e.g. the length of string suspended between the nut and saddle. On electric guitars, this isn’t difficult, as most electric guitars feature adjustable saddles.
However, on the acoustic guitar, adjusting intonation usually requires fine adjustments to be made to a standard saddle with a file or the use of a compensated saddle. However, truss rod adjustment can also help, as changing the amount of relief the neck has also affects the length of the guitar string able to vibrate.
For example, introducing additional relief (the neck bows inward) shortens the distance between the nut and the saddle (scale length) slightly, which also reduces the length of the guitar string suspended between the two.
Before you inspect the Neck
Tune-up
Make sure the guitar is tuned to standard pitch. There’s no point inspecting and making adjustments to the neck if not under the usual amount of tension from the strings.
Play the guitar
Before visually inspecting the neck you should also play the guitar and note any issues you feel or hear. Play each fret on each string up and down the neck and look out for fret buzz, dead notes, intonation issues, or high action before visually inspecting.
Get Yourself a Neck Rest

If you plan on working on guitars, a neck rest is more or less essential.
Small Changes Lead to Big Changes
Keep in mind, when working on your guitar that while you might identify specific issues such as fret buzz or high action when assessing the neck, the truss rod controls many aspects in terms of playability and will usually affect each of these things in different ways.
For example, you may find when introducing more relief to the neck to reduce the occurrence of fret buzz that the string action becomes too high for your liking, and you may then need to reduce the height of the saddle.
So keep in mind we are often looking for results that give us “the best of both worlds” e.g. making adjustments that benefit each potential issue, rather than fixing one thing only to negatively affect another. The trick is to make small, incremental changes and check how they affect the guitar before going further.
Ok, with that out of the way let’s begin by looking for one of the more serious problems that can occur, neck twist.
Neck Twist
While guitarists will mostly be interested in adjusting the truss rod to fix problems specific to neck relief, it’s a good idea first to rule out the possibility of the neck being twisted, as this is a more serious problem.
You may have noticed that when people inspect guitars they hold the guitar in front of them with the neck facing out and look along the length of the fretboard. I suspect a lot of us just do this because we see other people do it 🙂 but the main reason this is done is to check for a twist in the neck.
Neck twist refers to rotation of the neck (in either direction), as opposed to outward or inward bow (neck relief). If there is a significant twist in the neck, chances are you would have noticed it already. The action would be inconsistent e.g. your bass strings might be buzzing out while your treble strings are too high, or vice versa at various positions on the neck.
To identify twists, do as mentioned above, and hold the guitar up directly in front. You can also set the bottom of the guitar on the ground and look down the neck from the headstock.

Ideally, you need the bridge, nut, and individual fret wires visible at the same time to compare and check for correct alignment. You can quickly identify a problem by the fact that one or more will appear out of alignment, as per the image below.
How to Fix a Twisted Neck on Your Acoustic Guitar

If the neck of your guitar has an obvious twist, and the guitar is still under warranty, take it back.
Let the manufacturer address the problem. Having the neck repaired will be expensive and, in some cases, it won’t be possible.
In other cases, while the neck may have a slight twist, the guitar may still play well. If this is the case you will need to decide whether it is worth doing anything about it. But, in any case, keep an eye on the neck periodically and look for signs of the problem progressing.
If the guitar isn’t under warranty, and you suspect the twist could be due to the truss rod and isn’t necessarily a twist in the wood itself, you can try loosening the truss rod (we’ll address this in the next section) and let the guitar neck settle for a few days. Then try setting the neck relief with the truss rod again and check if the twist still exists under tension.
In most cases, if the neck has a twist it will be the wood itself, meaning you will need to speak to a luthier as the only cure is to remove the fretboard completely, plane the neck flat and replace the fretboard. Alternatively, a luthier may also refret the fretboard relative to the amount of neck twist, or apply heat in an attempt to remove the twist in the neck, but this isn’t always possible or practical.
Neck Relief
While neck twist is a serious problem, thankfully, it’s also relatively uncommon. Problems with neck relief are far more common, but the good news is, that they are much easier to fix as anybody can make adjustments to the neck, using the truss rod.
Neck relief refers to how much (inward or outward) bow the guitar neck has. Reducing the amount of relief is done to address the action being too high near the middle of the neck which can also affect intonation. More commonly, however, neck relief is increased to reduce the occurrence of fret buzz.
What is Fret Buzz?
Fret buzz occurs when the strings of the guitar ‘buzz’ against the fret wires causing dead notes and that annoying buzzing sound when you play.
Why Guitars Need Some Neck Relief
A dead-straight neck is not what we want here, as that wouldn’t provide sufficient clearance for the strings at the point where their vibrational arc is greatest, resulting in the strings ‘buzzing’ the fret wires.

As seen in the diagram above, guitar strings vibrate on a wider vibrational arc toward the centre of the section of the string (like a skipping rope) as this is the furthest point from any fixed point e.g. the nut and saddle, or the guitarist’s fingers when fretting a note.
How to Tell if Your Truss Rod Needs Adjusting?
If the neck has insufficient relief to counter the wider vibrational arc the strings will ‘buzz’ against the fret wires. On the other hand, if you notice your action is too high toward the middle of the neck but not excessively high in the open position (the first four frets) chances are your neck has too much relief and the truss rod needs to be tightened.
How to Adjust the Truss Rod

Some acoustic guitars, like most electric guitars, provide access to the truss rod at the headstock, requiring the truss rod cover to be removed to gain access. This is the case for Taylor acoustic guitars and Gibson.
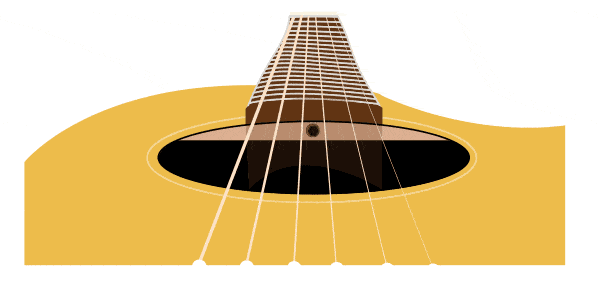
But, for the majority of acoustic guitars (including Martin), it will be found inside the soundhole under the fretboard. You will usually find it as pictured above, threaded through a hole in the transverse brace e.g. the brace that spans the width of the upper bout of the guitar at the top of the soundhole.
If you have never adjusted your truss rod before don’t worry, provided you work in small increments e.g. quarter turns only, there’s very little chance of problems occurring. But it would be remiss of me not to say again, work in small increments.
Don’t over-tighten the truss rod or problems will occur e.g. the nut could snap off the rod, or in extreme cases, the neck could crack. If you go too far the other way, the rod itself could become loose in the truss rod channel and develop a rattle.
Truss Rod Adjustment Tools

To adjust the truss rod you will require a tool (this may have come with your guitar) or you may need to source the correct size wrench, nut driver, or hex key aka alum key.
You can also buy guitar maintenance packs that include tools for adjusting your truss rod. Just ensure you use the correct size tool, otherwise, you run the risk of stripping the nut.
Which way to turn the Truss Rod

To increase neck relief turn the truss rod to the left (counter-clockwise). This loosens the truss rod, allowing the tension from the strings to draw the two ends of the neck toward each other.
To reduce the amount of neck relief, turn the truss rod to the right (clockwise). This tightens the truss rod, forcing it to straighten, ultimately reducing the amount of relief on the neck.
If ever in doubt remember, right = tight.
How much neck relief should an acoustic guitar have?

As you can see in the diagram above, once sufficient relief is introduced to the neck, the guitar is far less likely to have obvious fret buzz. Although in most cases all guitars will experience at least some amount of fret buzz.
So, what’s the correct amount of neck relief for an acoustic guitar?
The amount of relief your guitar should have depends on your playing style and personal preference. In most cases, neck relief is set between .008” (.2mm) and .010” (.25mm). You can also check your guitar’s user manual, if available.
But, if you mostly strum cowboy chords (open chords) and play fairly aggressively, you are likely to need more relief to prevent fret buzz as the vibrational amplitude of the strings will be greater.
If you play with less attack, you may prefer less relief e.g. (.006” (.15mm)). However, this also depends on your action, which is mostly controlled by the nut and saddle.
Fretboard Radius
You might notice some curvature across the fretboard, known as fretboard radius (aka fingerboard radius). The nut and saddle will usually also be radiused, although tapered to allow additional height for the bass strings. This means the amount of relief isn’t affected (under most circumstances) by the fretboard radius, so isn’t something you need to take into account. Especially not if working on a classical guitar which usually features a flat fretboard.
How to Measure Neck Relief
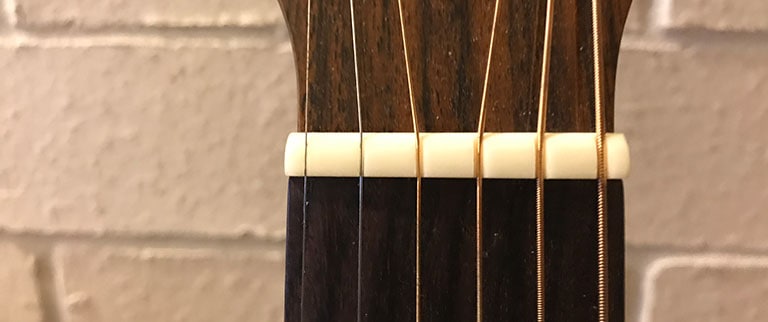
When measuring neck relief we need to create a straight line between the 1st and 12th fret and then measure the distance at the approximate center e.g. the 6th fret. To do this the nut must be taken out of play or it will mean the string won’t be resting against the first fret providing us a straight edge between the 1st and 12th fret.
Why not measure the entire neck?
If measuring neck relief on an electric guitar you might measure the entire scale length, but for an acoustic guitar, it’s unlikely you will alter the neck with the truss rod past the neck joint.
You can use a capo to ensure the string is sitting on the first fret wire. If you don’t have a capo you can quickly make something like this with a pencil and a few rubber bands.
You can then use one hand to fret the 12th fret and with your spare hand slide the feeler gauge between the gap between the fretboard (at the 6th fret) and the strings. If you don’t have a feel gauge or prefer to go by feel, simply tap the fret at the 6th fret with an outstretched finger.
There should only be a slight amount of movement as you press on the string. If the string is sitting hard against the 6th fret you should loosen the truss road and increase the amount of relief.
Final Thoughts
Making adjustments to your guitar’s neck isn’t all that difficult. If you plan to start working on guitars in general e.g. adjusting intonation or performing fretwork you will also find knowing how to adjust the truss rod useful. If you liked this article, be sure to check out our other articles on guitar maintenance here.


